(ARA) – The richest memories of Christmas aren’t of things you’ve bought. Something plucked from a store shelf at the last minute doesn’t say much about the giver or the receiver. Christmas is a time of traditions and togetherness, and it’s a little bit different for every family. While the holiday you’re celebrating is the same as what other people are enjoying around the world, you create your own Christmas with the traditions you keep through the years.
That’s not to say that the only traditions you observe are the ones that have been passed down generation after generation. With every year comes a new opportunity to make lasting Christmas memories — ones you’ll want to repeat in years to come.
Gift giving doesn’t need to be impersonal, either. Whether you’re a savvy crafter or a new hand at making your own presents, creating handmade gifts is a sure way to give something that comes from — and goes right to — the heart. For the giver, there’s the pride of making something beautiful and fun, especially for your loved ones. As the receiver, what could be more meaningful than a gift that someone put their time, effort and skill into, just for you? And gifts like these might just become holiday traditions.
Create a sweet tradition
Since baking is a time-honored Christmas ritual, many spend time in the kitchen, readying sweet treats that guests can nibble on or to give as gifts. One of the most essential necessities during the fun and occasionally messy task of making cookies is an apron, making it a perfect gift for avid bakers.
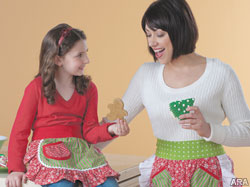
Jennifer Ackerman-Haywood, columnist, podcaster and blogger at CraftSanity.com teamed up with Jo-Ann Fabric and Craft Stores to design a holiday gift: two aprons at once — one for mom and one for her little baking helper. Of course, they can be used all year round, but keeping mother and daughter holiday aprons in a box with Christmas cookie cutters that get pulled out for the holiday season will give them even more meaning. In future years, those little baking helpers might grow into mom’s aprons and pass their own versions down to their own junior bakers.
Gifts that really keep giving
Even some items that you might not expect to pass down can become a holiday tradition. A simple project you can create as a family is just part of the fun: together, you can make re-useable gift tags to give your Christmas even more character. They can adorn this year’s gifts, and be addressed to specific gift recipients and then be wiped clean. If you use them within the family, you can keep them with your Christmas decor, and if you use them on gifts for people outside your household, they’re a bonus gift that your receiver can share with their friends and family, too.
By following these project instructions from Jo-Ann Fabric and Craft Stores, you can add to your holiday traditions and create your very own Christmas. For more information, go to www.Joann.com.
Mother and Daughter Holiday Aprons
Supplies and tools:
* 1/2 yard fabric A for child’s apron and pockets on adult’s apron, green and red/white stripe print
* 1 yard solid red fabric for apron ties on both aprons and waistband on child’s apron
* 3/4 yard fabric B for adult’s apron and child’s apron trim, red with white snowflake print
* 1/4 yard solid white fabric for top layer trim on adult’s apron
* 1/4 yard fabric C for bottom trim on adult’s apron, white/pink/red print
* 1/8 yard fabric D for child’s apron pocket, red with white Ho! Ho! Ho! print
* 1/4 yard fabric E for adult’s waistband, green polka dot
* 1 package 1/4 inch double-fold bias tape for pocket trim on adult’s apron, red
* 1 package Wrights medium rickrack trim, white
* Basic sewing supplies
* Sewing machine
* Iron and ironing surface
Directions:
1. Cut a 15 1/2 inch by 10 inch piece from fabric A for child’s apron. Fold in half to 7 3/4 inches by10 inches and round the outside corners on one end with scissors.
2. Cut four 5 inch squares from fabric A for adult apron pockets. Stack up pocket pieces and round two bottom corners. With right sides facing, sew two pocket pieces together leaving a 2 inch opening on the side for turning. Turn right side out and press. Use a large basting stitch to gather the top of pocket to measure 3 1/2 inches. Repeat for second pocket. Finish top of pockets with red bias tape trim and set aside.
3. Make a 72 inch by 5 inch strip of fabric B for child’s ruffle. Hem one long edge of ruffle and set aside.
4. Cut an 18 1/2 inch by 13 inch piece from fabric B for adult apron. Fold piece in half to 9 1/4 inches by 13 inches and round the outside corners on one end.
5. Make a 108 inch by 3 inch strip from white fabric for top ruffle layer on adult’s apron. Hem one long edge of ruffle and set aside.
6. Cut 108 inch by 5 inch strip from fabric C for the bottom ruffle layer of adult’s apron. Hem one long edge of ruffle and set aside.
7. Cut two 4 1/2 inch squares from fabric D for single pocket on child’s apron. Round two bottom corners. With right sides facing, sew two pocket pieces together leaving a 2 inch opening on the side for turning. Turn right side out and press. Use a large basting stitch to gather the top of pocket to measure 3 1/2 inches. Sew red bias tape around the perimeter of the pocket. Set aside.
8. Cut a 19 1/2 inch by 7 inch waistband out of fabric E for adult’s apron. Turn and press a 1/2 inch hem around perimeter. Fold in half lengthwise with right side facing and press again. Set aside.
9. Cut a 15 1/2 inch by 7 inch waistband out of solid red fabric for child’s apron. Turn and press a 1/2 inch hem around perimeter. Fold in half lengthwise with right side facing and press again. Set aside.
10. From the solid red fabric, cut two 38 inch by 6 inch ties for the adult’s apron and two 25 inch by 6 inch ties for the child’s apron. Fold each piece in half with right sides facing, cut one end on the diagonal, then sew around two long sides and pointed tie end, leaving a 1/4 inch seam allowance. Leave the non-pointed end of the tie that connects to the apron open for turning. Turn right side out and press. Top stitch around same three sides of each tie. Set aside.
11. Attach two pockets on a slant to main fabric for the adult’s apron. Then attach the single pocket to the child’s apron on a slant.
12. Gather each ruffle by sewing two lines of large basting stitches across the top of each piece of fabric. Pin center of ruffle to bottom center of main apron fabric with right sides facing and then adjust the gather to evenly distribute the ruffle along the edge of the fabric, pinning as you go. For the adult’s apron, pin the shorter white ruffle on first, followed by the longer ruffle cut from fabric C. Sew ruffles in place.
13. On the child’s apron, sew a piece of white rickrack to cover the ruffle seam on the front of the apron.
14. Using long basting stitches, gather the top of both aprons so that each apron fits its respective waistband. Pin waistband on and stitch in place along the bottom edge, leaving the ends open.
15. Place the flat end of one of the shorter ties about an inch into the open waistband of the child’s apron and sew in place. Attach second tie to other side of waistband the same way. Sew longer ties to adult’s apron.
Skill level 2: Some experience necessary
Approximate crafting time: 1 1/2 hours per apron
Reusable Gift Tags (Fabric and wood)
Supplies and tools: (for fabric tags)
* 1/4 yard holiday-themed fabrics in various prints
* 1/4 yard solid white fabric
* HeatnBond Ultra Hold iron-on adhesive
* Peltex fusible stabilizer
* Trim to coordinate with fabrics
* Tacky glue
* Hole punch
* Washable fabric marker
* Iron and ironing board
* Scissors
Directions: (for fabric tags)
1. Cut out the provided patterns.
2. Cut pieces of holiday print fabrics, white fabric and Peltex slightly larger than each pattern.
3. Fuse print fabric to one side of Peltex and white fabric to the other side of Peltex.
4. Use marker to trace around pattern on white side.
5. Fuse HeatnBond to wrong side of printed fabric and cut out shape pattern for the front.
6. Using pattern as guide, fuse print shape onto white side.
7. Cut tag out along drawn lines.
8. Glue trim onto tag as desired.
9. Use hole punch to create holes at top of tag.
10. Write recipient’s name on tag with washable marker.
11. To reuse, eliminate the writing by dabbing it with a damp cloth. Allow to dry and write new message or name.
Supplies and tools: (for wood tags)
* Chalkboard paints: blue, black, red, green
* Ready-to-finish wood shapes
* Acrylic paints in colors of choice
* Paint brushes: 1/2 inch flat, detail
* White felt
* Gold papers
* Star punch (and/or star template)
* Gold glitter glue
* Tacky glue
* Scissors
* Chalk
Directions: (for wood tags)
1. Paint each wood shape as desired. Let dry. On the area that will be written on in chalk, apply one or two layers of chalkboard paint. When dry, write on surface, following manufacturer’s directions.
2. For clothespin tag, follow directions in step 1, leaving clip end free for decoration. Cut and/or punch stars from felt and paper. Decorate with glitter glue and allow to dry. Layer the stars onto the clothespin; glue in place. Decorate clothespin with glitter glue.
Skill level 1: No experience necessary
Approximate crafting time: 1-2 hours per tag